
The Payment Accounts feature allows to connect the bank accounts to Finblick, synchronize bank transactions, and match them against financial documents directly in Salesforce.
Bank transactions can be matched with the following document types:
- Invoice
- Credit Note
- Self-Billing Invoice
- Receipt
- Charge
This enables efficient reconciliation of incoming and outgoing payments while keeping the payment status of financial documents up to date.
Important: Banking integration is an add-on and must be ordered separately. It is not included in the standard Finblick feature set. The functionality described in this article is only available after the Banking integration add-on has been activated.
Prerequisites #
Before users can work with the Payment Accounts, the appropriate permissions must be assigned.
Each user must have:
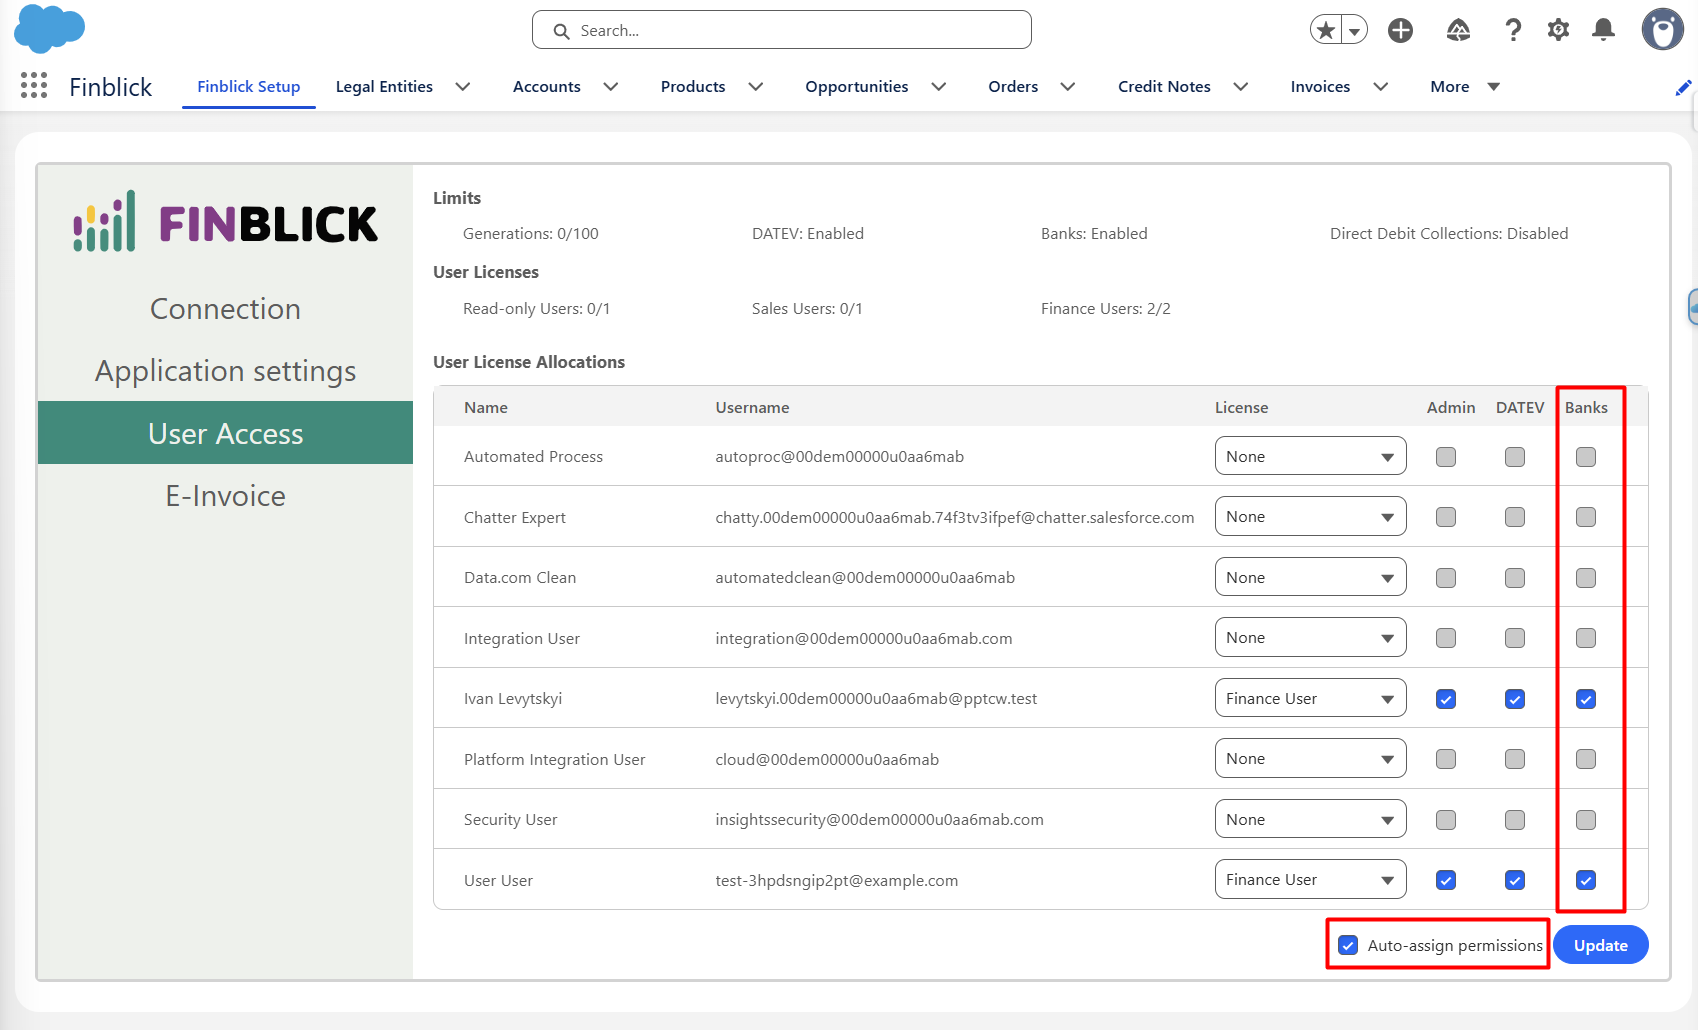
- A Banks license assigned.
- The Finblick Banks User permission set.
If the Auto-assign permissions checkbox is enabled during license assignment, the Finblick Banks User permission set will be assigned automatically.
Step-by-Step Instructions to Configuring Access #
Now, let’s take a closer look:
- Go to Finblick Setup.
- Click on User Access.
- Select the users you want to assign the Banks license to.
- Check “Auto-assign permissions” and click Update.
Step-by-Step Guide to Connecting a Bank Account #
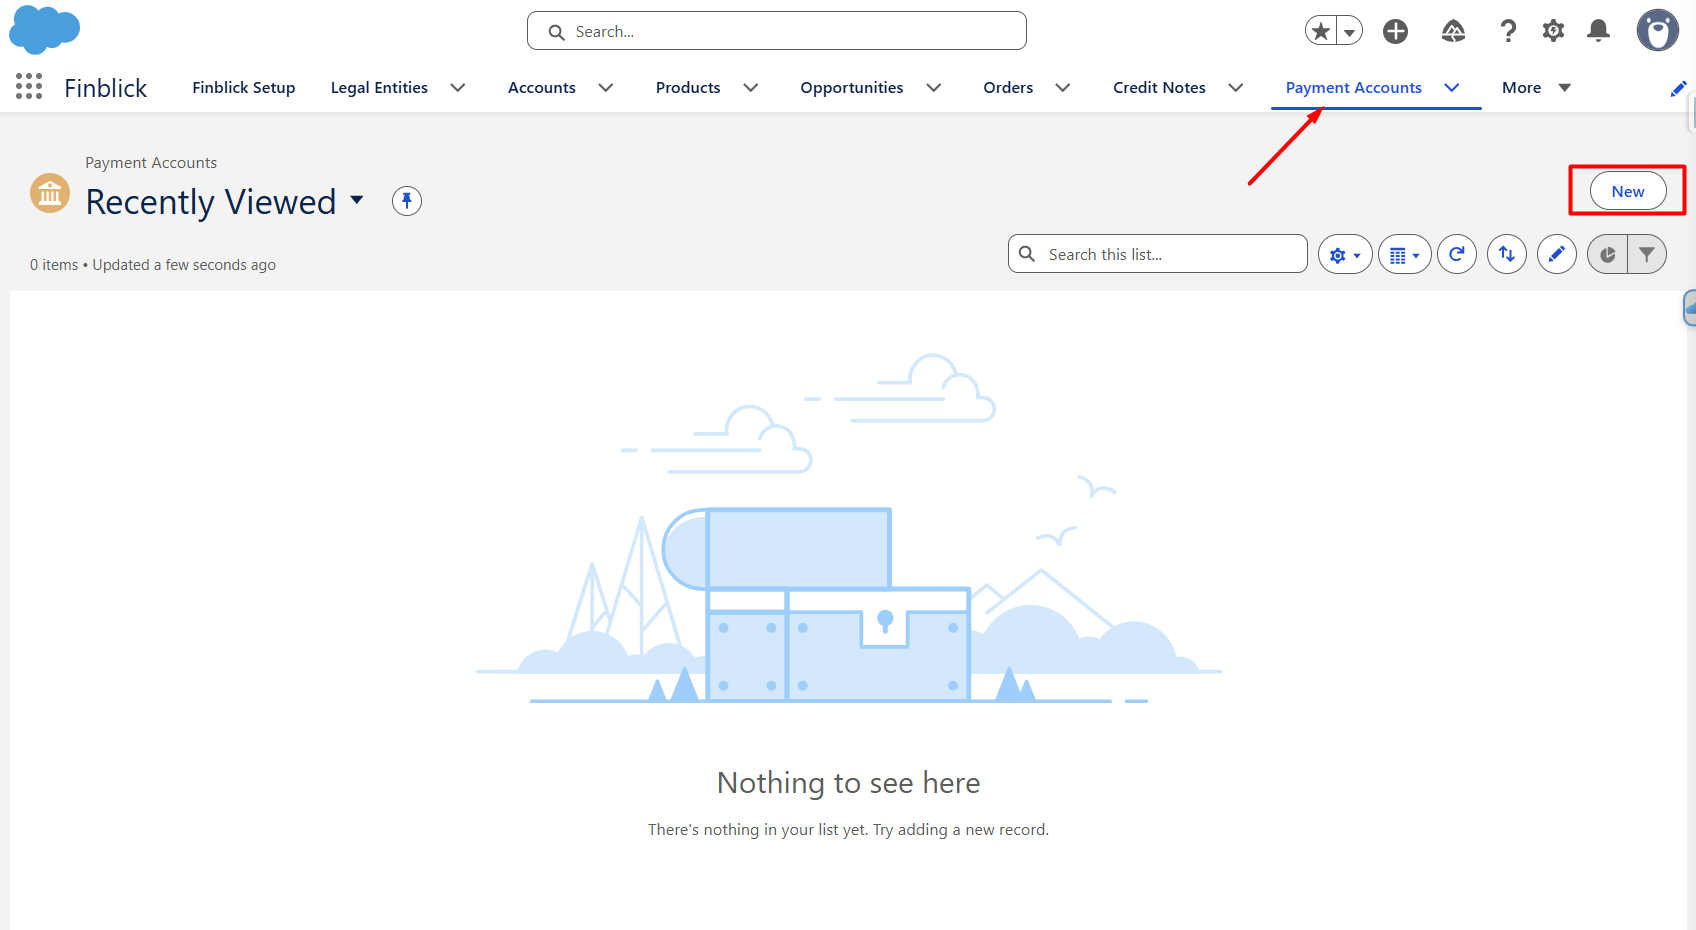
- Navigate to the Payment Accounts tab.
- Click New to create a new Payment Account record:
- A dialog window with a bank search appears. Search for and select the desired bank:
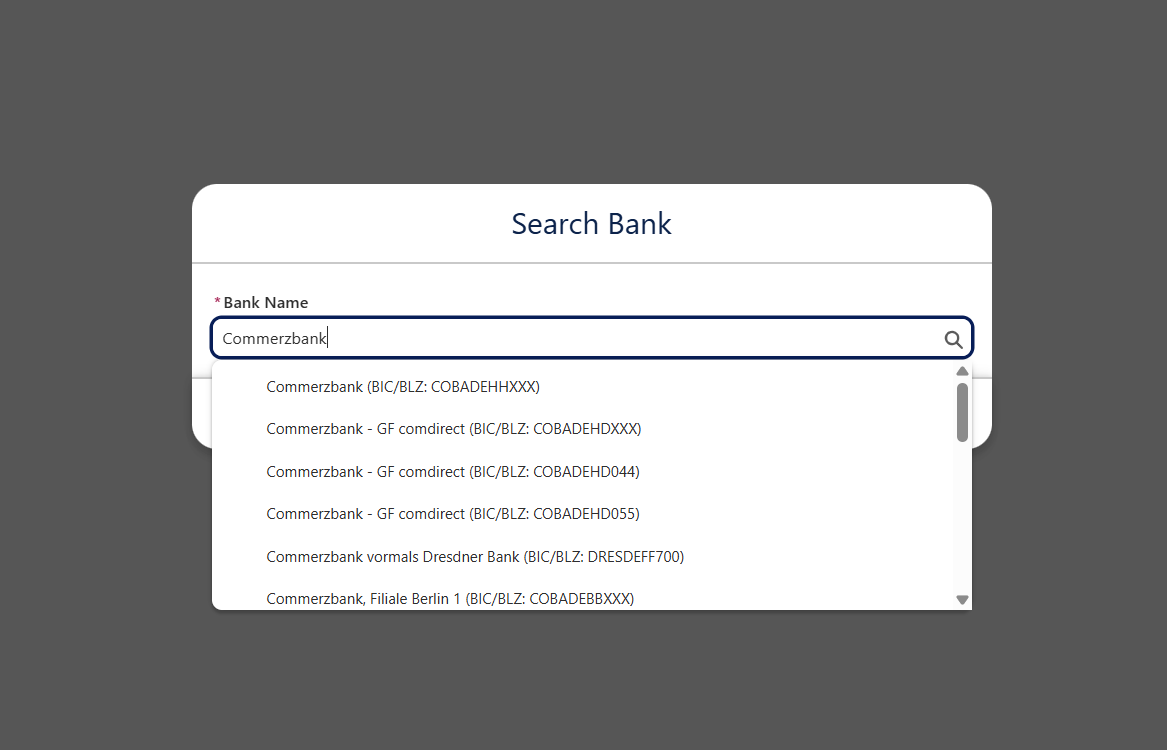
- Click Continue.
- After selecting the bank, a secure authentication window opens:
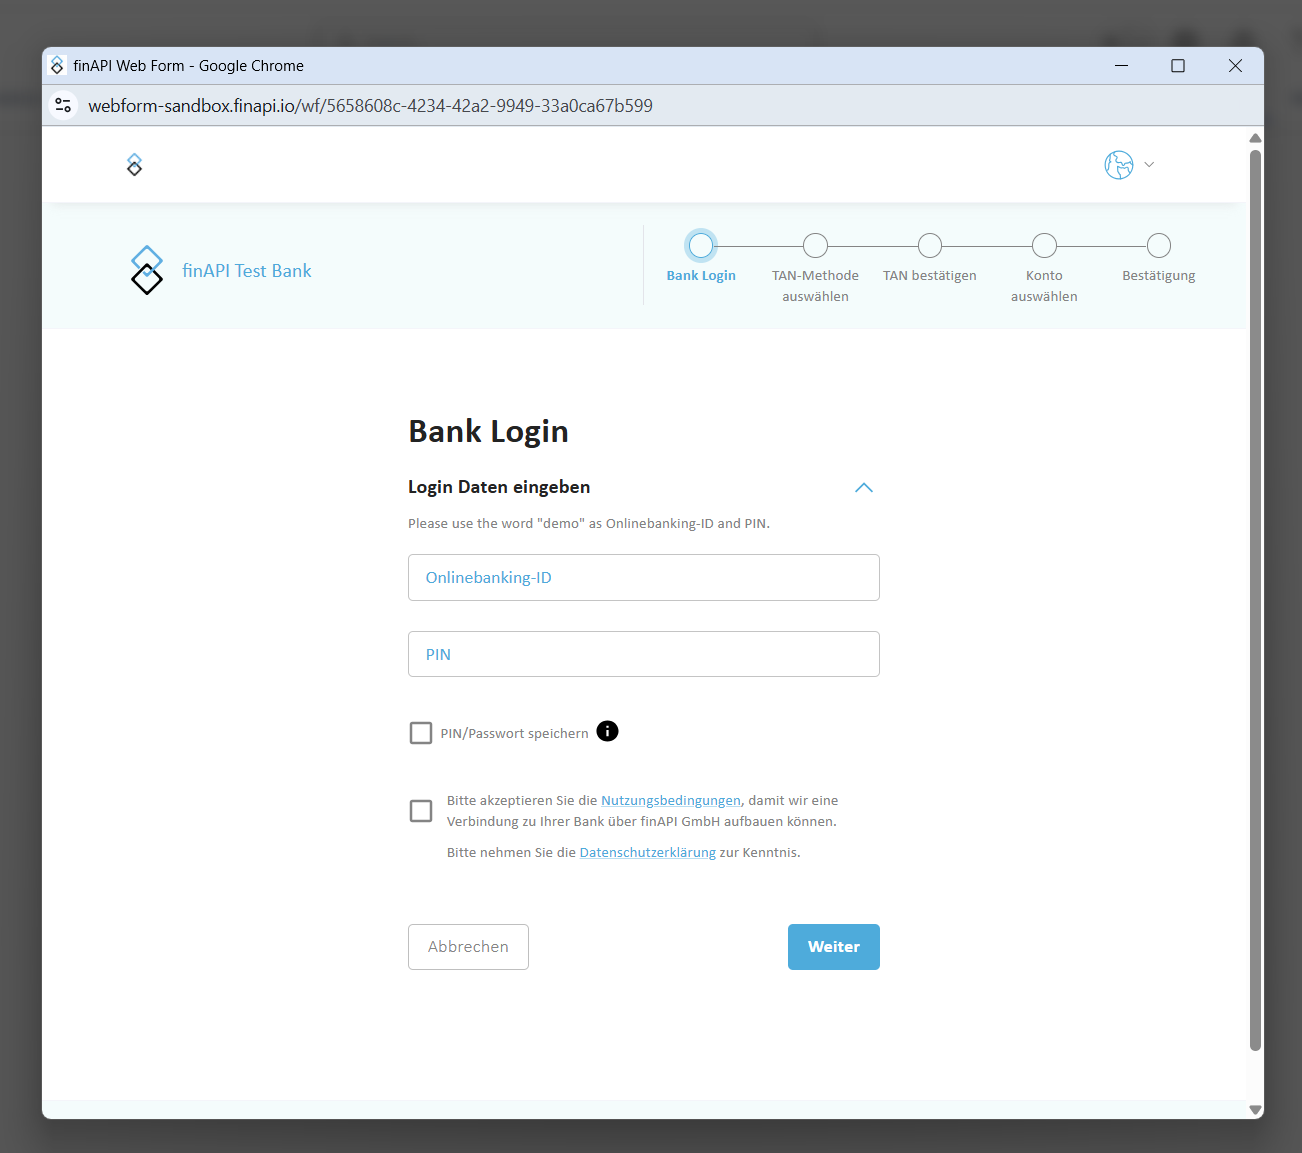
- Complete the authentication process using your online banking credentials.
If multiple bank accounts are available, select the account(s) that should be connected.
After the authentication process is successfully completed, the process in Salesforce may still be loading, so it is necessary to wait until it finishes.
- Verify the created Payment Account records:
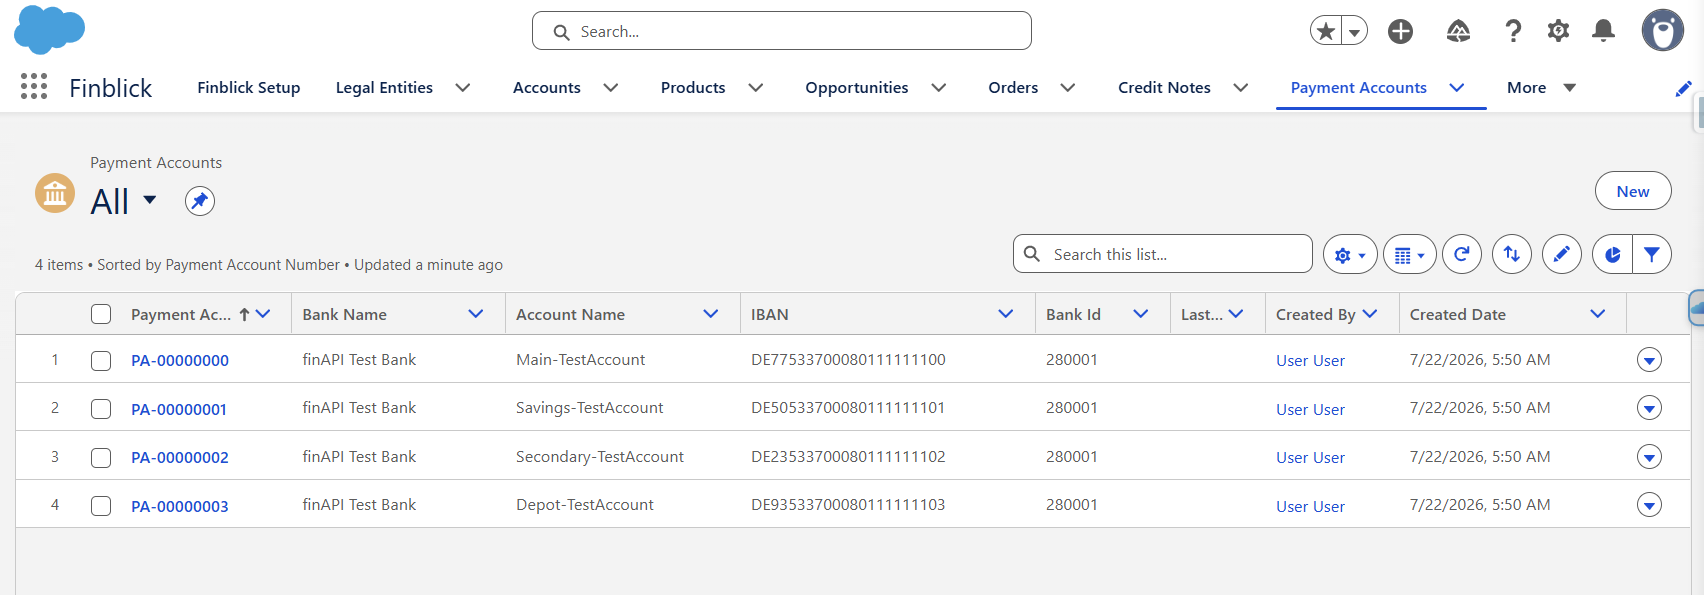
After the connection is established, Finblick automatically creates one Payment Account record for each selected bank account.
Step-by-Step Guide to Synchronizing Transactions #
- Open the desired Payment Account record.
- Start the synchronization by clicking the Sync button:
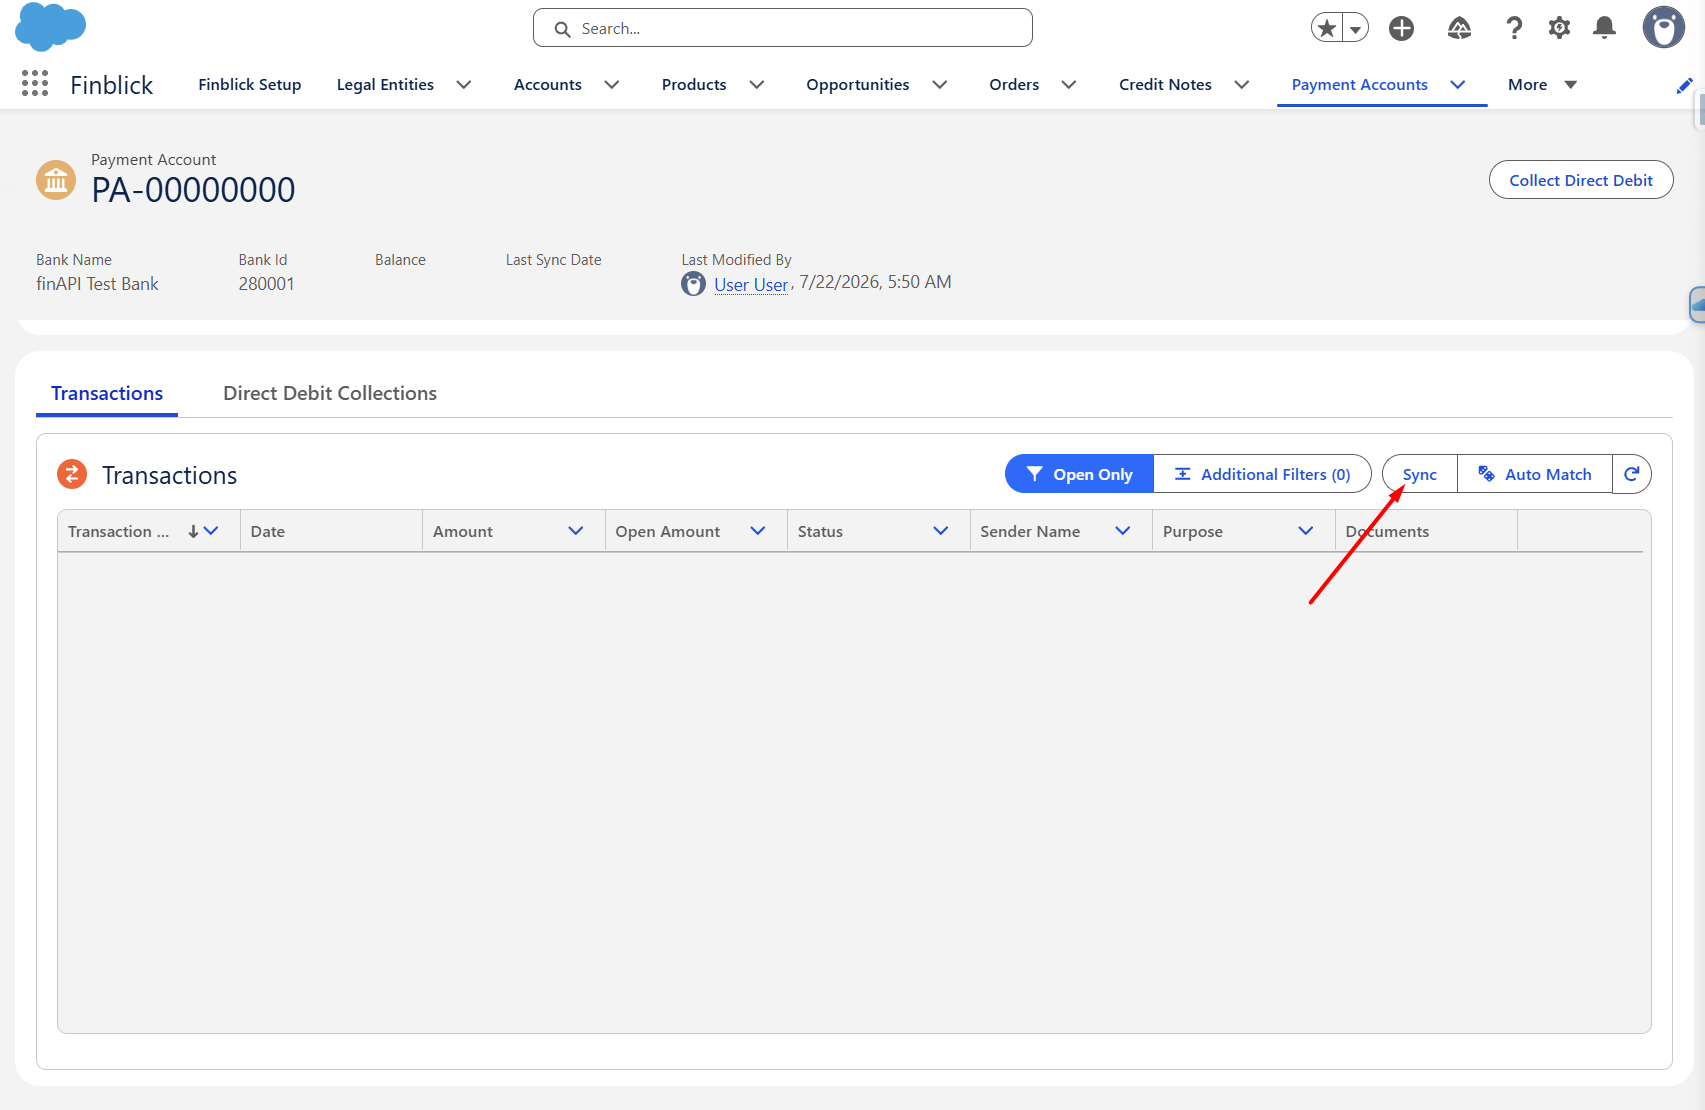
3. Review the synchronization date:
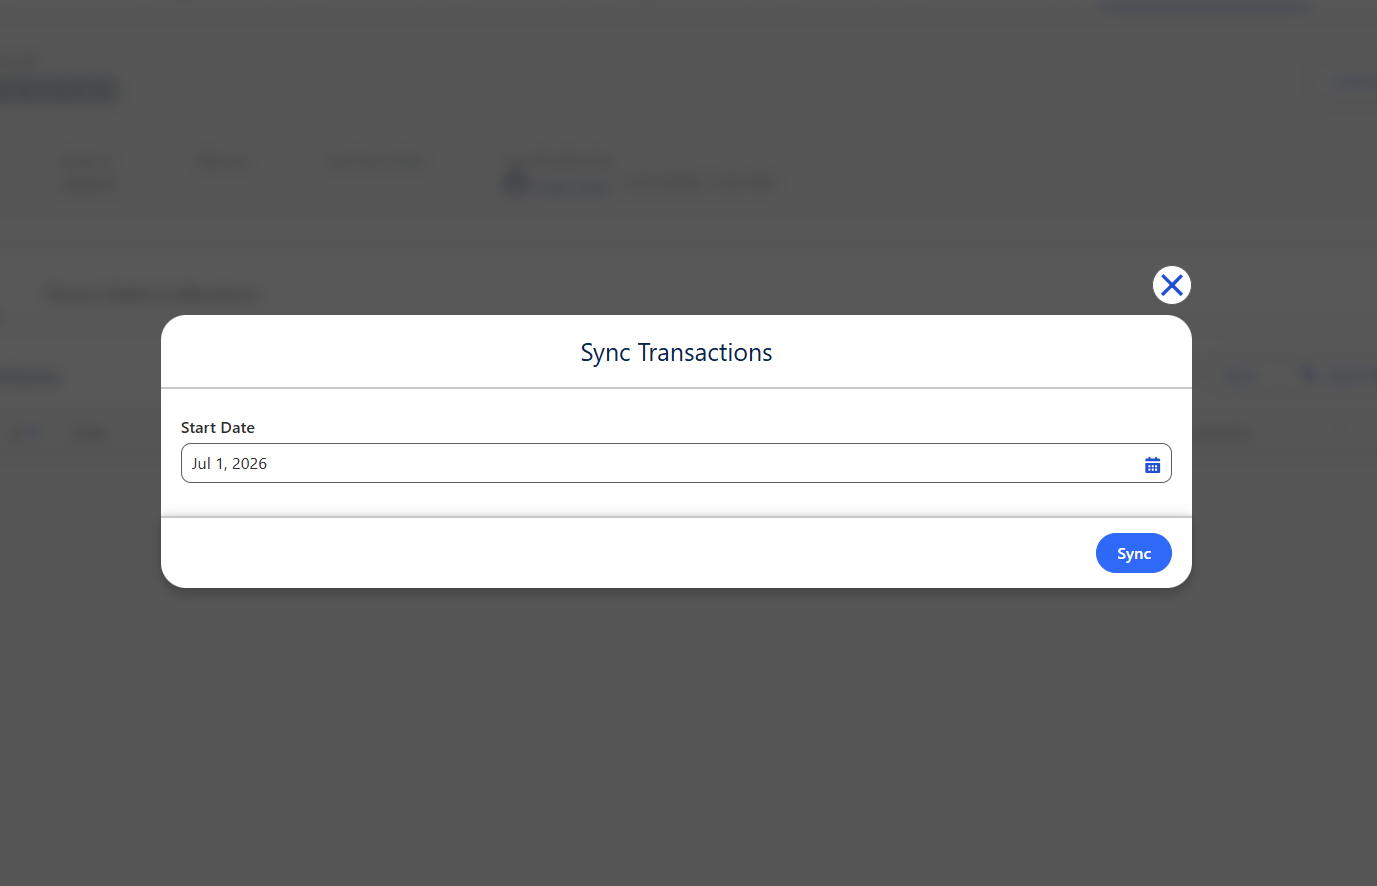
During the first synchronization, the synchronization date is automatically populated with the first day of the current month.
After every successful synchronization, the date is automatically updated to the last successful synchronization date.
- Click Sync to import transactions:
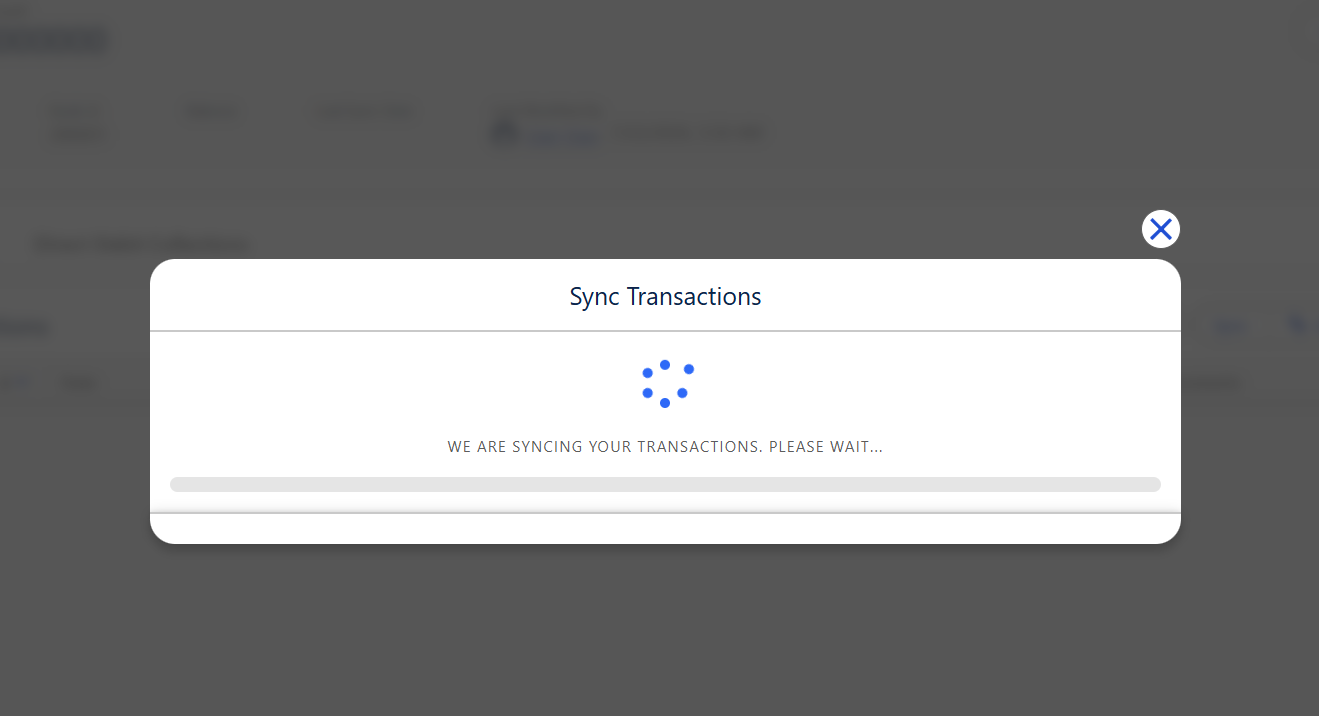
- The synchronized transactions become available for reconciliation:
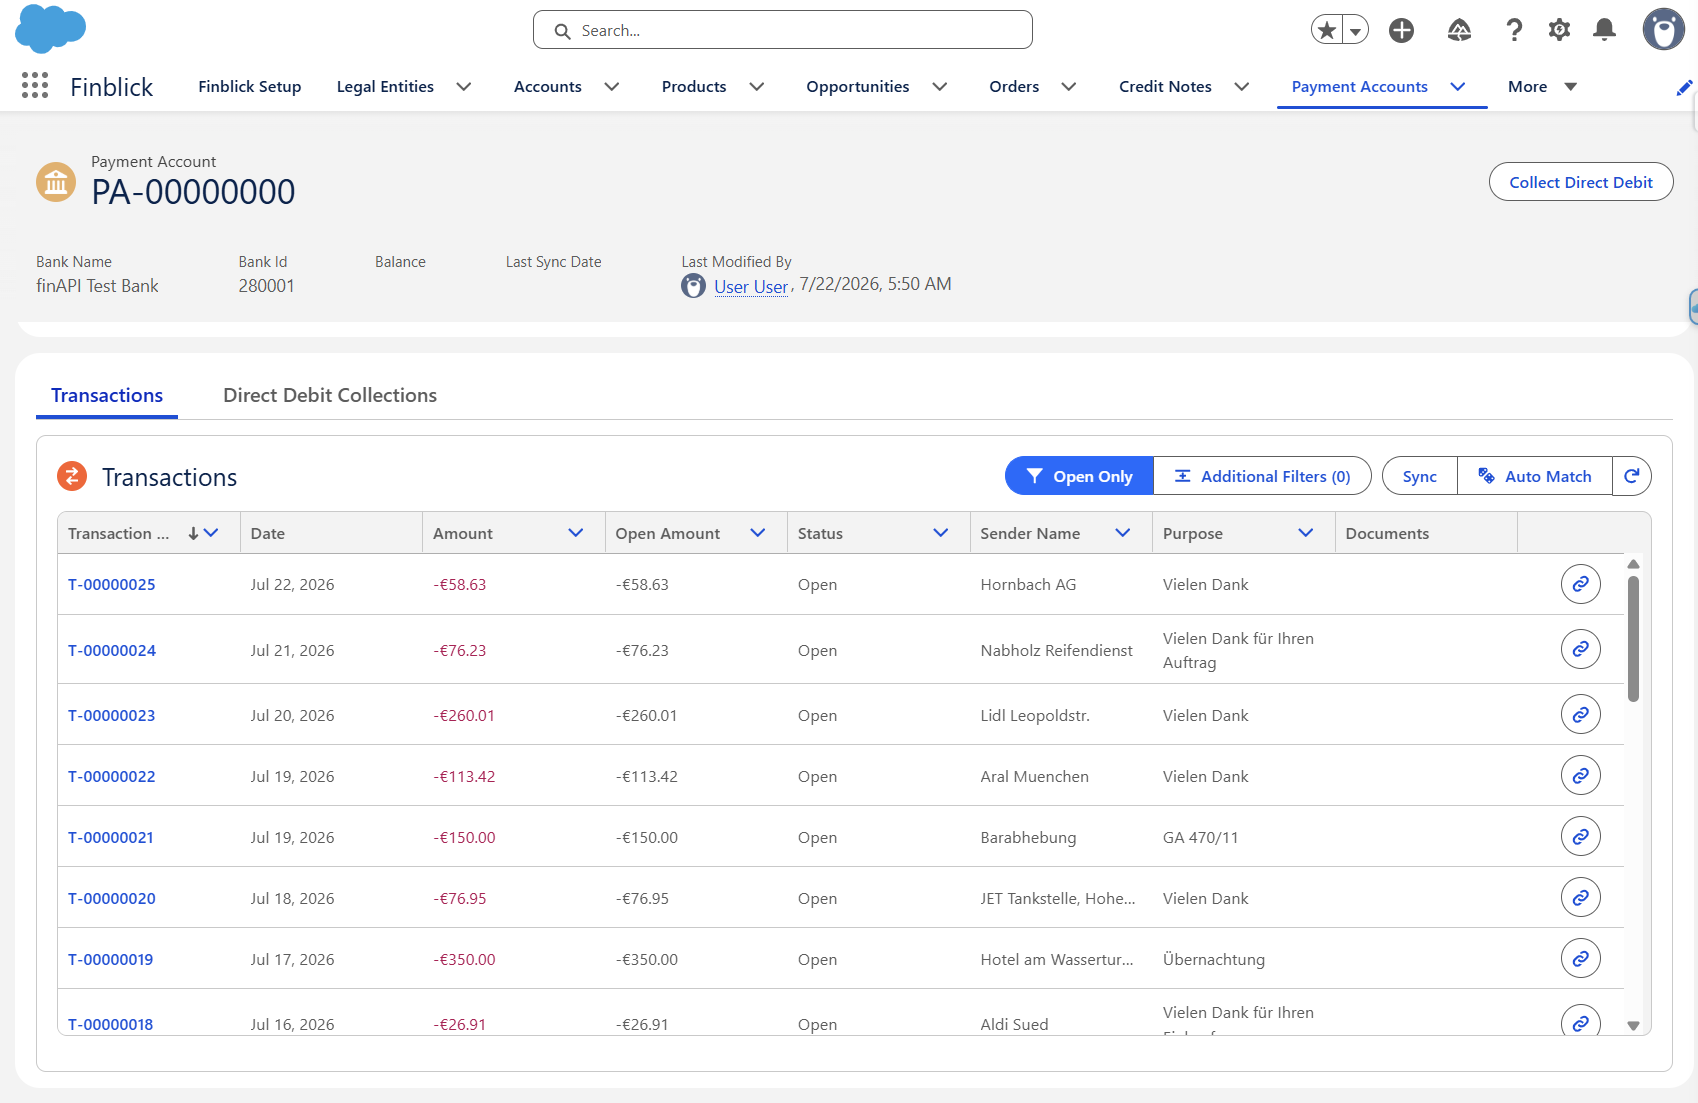
It is strongly recommended not to manually change the synchronization date unless absolutely necessary.
Example:
- Last successful synchronization: 25.06.2026
- Prepopulated synchronization date when running next sync: 25.06.2026
- User manually changes the date to 26.06.2026
If any transactions occurred on 25.06.2026 after the previous synchronization, those transactions will not be synchronized because the synchronization starts from the manually selected date. This may result in missing bank transactions.
Step-by-Step Guide to Matching Transactions #
- Select the desired transaction from the Transactions related list of the Payment Account and start the matching process.
- Click Match Transaction:
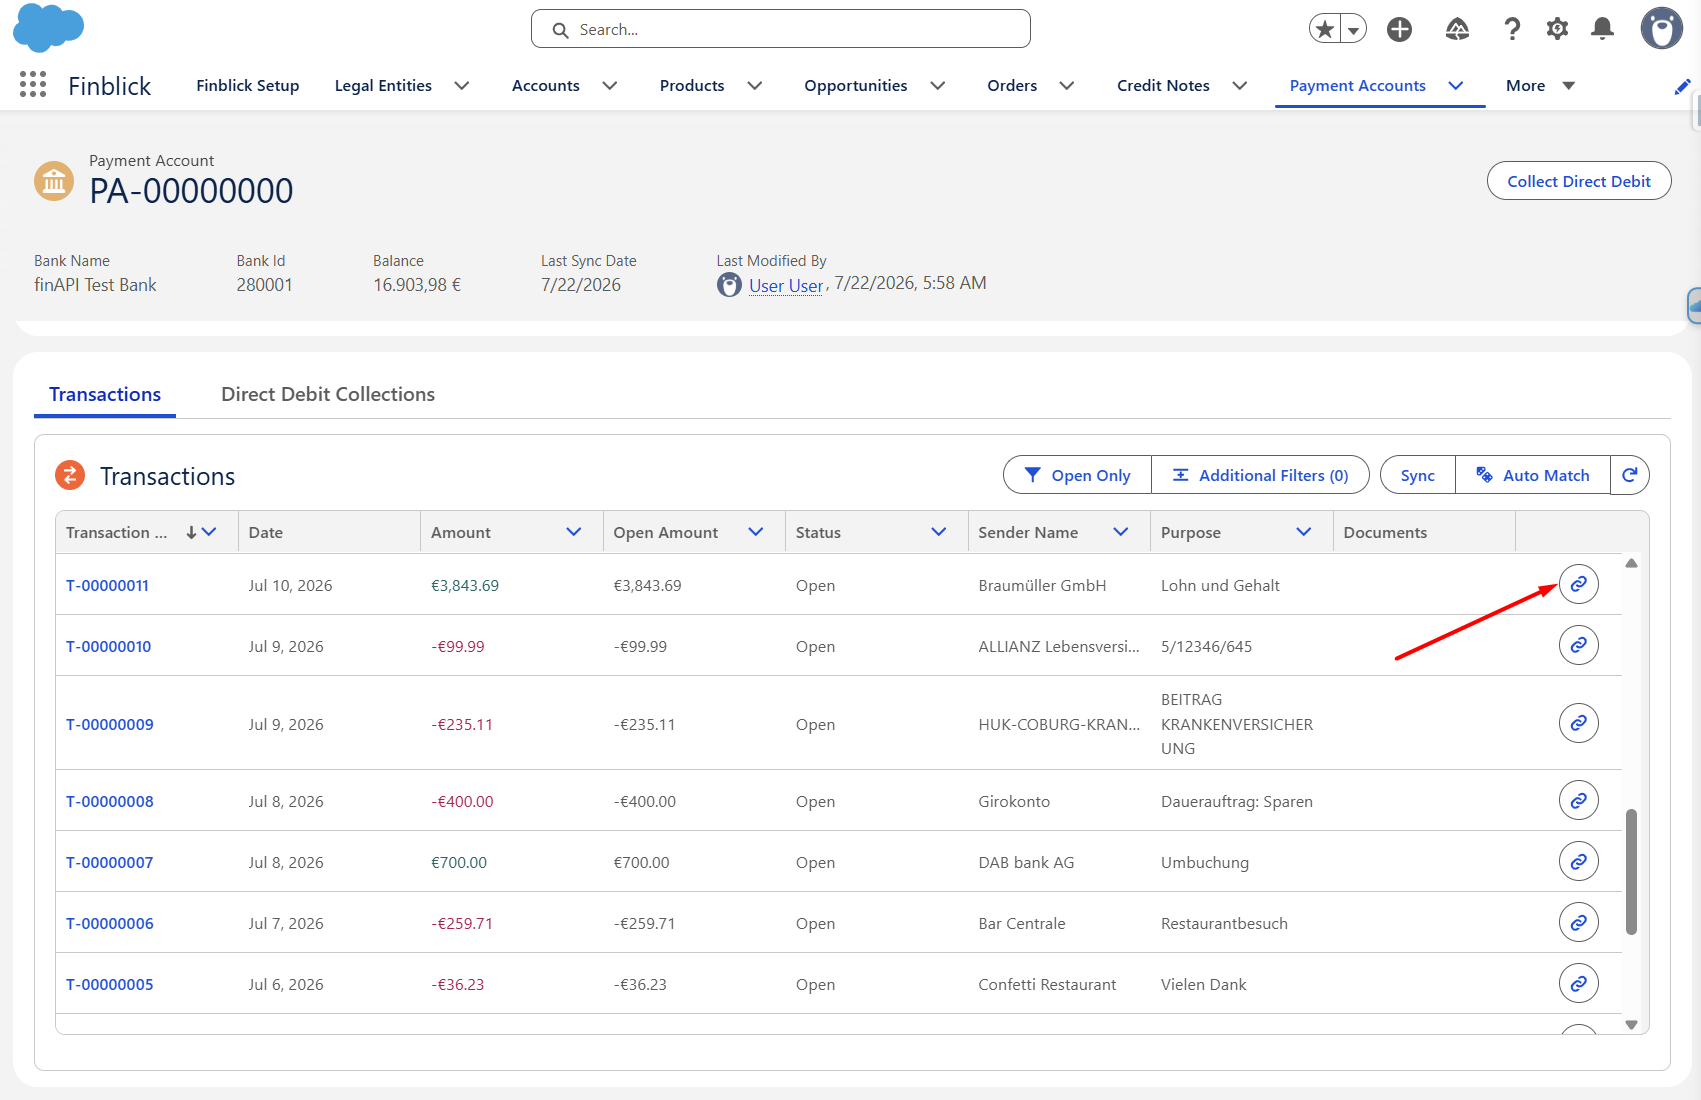
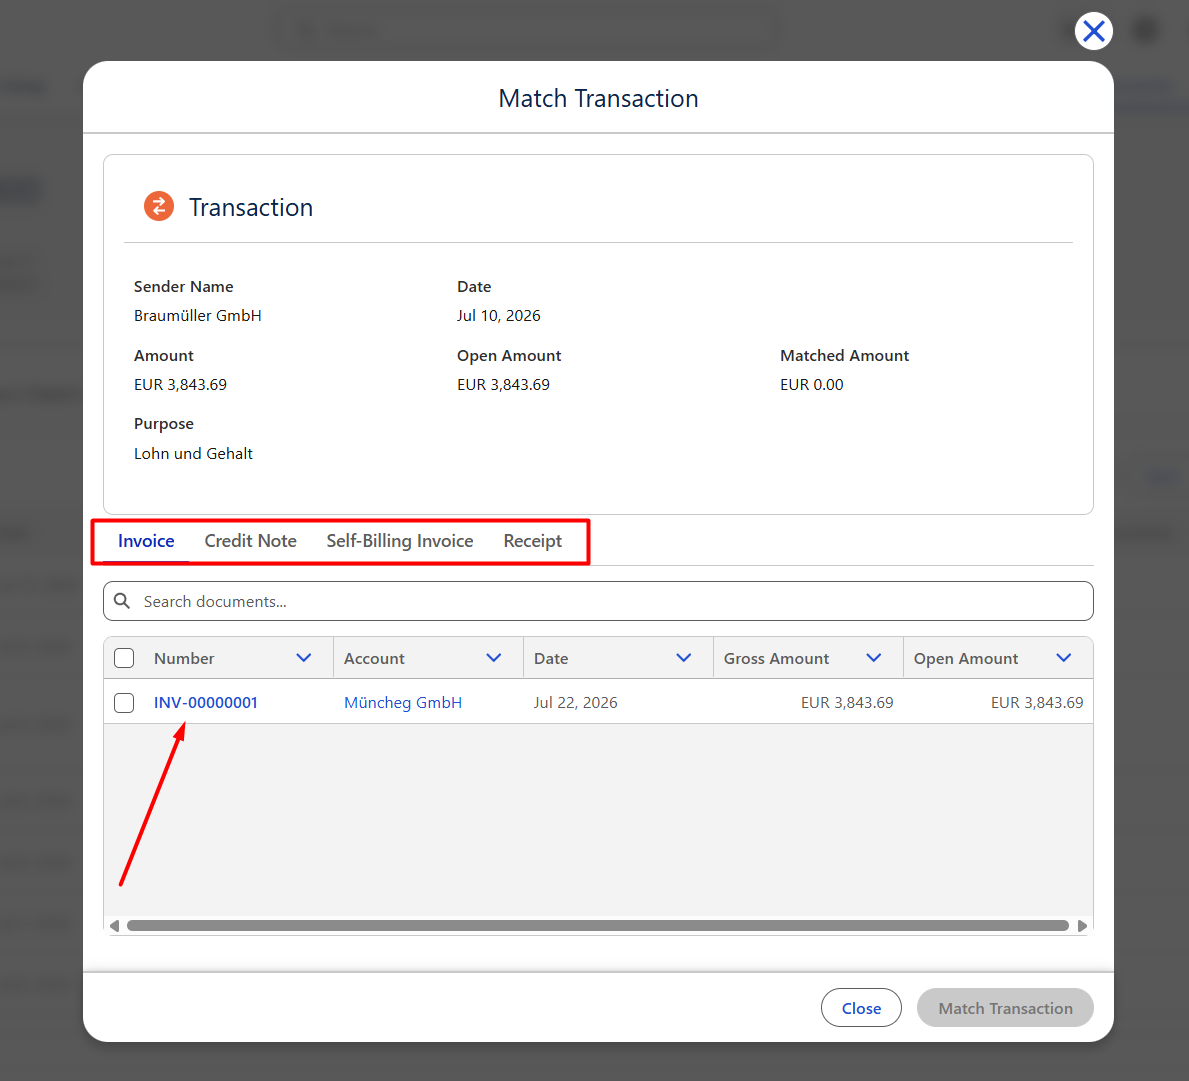
- Select the financial document in the Match Transaction dialog window.
- Search for and select one or more of the following document types:
- Invoice
- Credit Note
- Self-Billing Invoice
- Receipt
- Charge
- Search for and select one or more of the following document types:
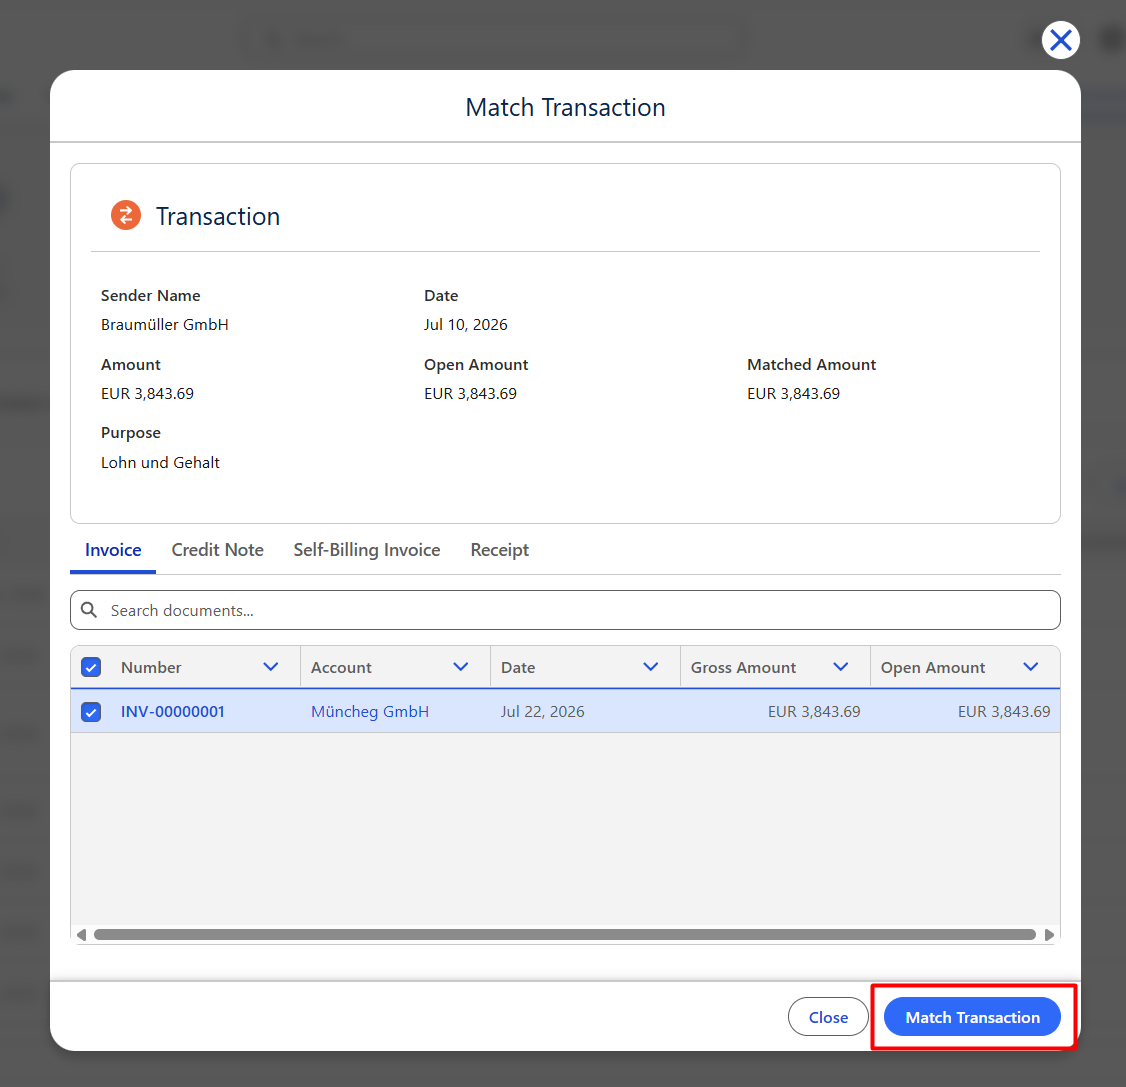
- Complete the matching:
Transaction Matching Scenarios #
Finblick supports three different matching scenarios depending on the relationship between the transaction amount and the selected document amount.
Matching Scenario 1 – Amounts Match #
If the Transaction Open Amount is equal to the Document Amount:
- The transaction is marked as Booked.
- The selected document is marked as Paid.
Matching Scenario 2 – Transaction Amount Is Greater Than the Document Amount #
If the transaction amount exceeds the total amount of the selected document(s), Finblick displays the following information:
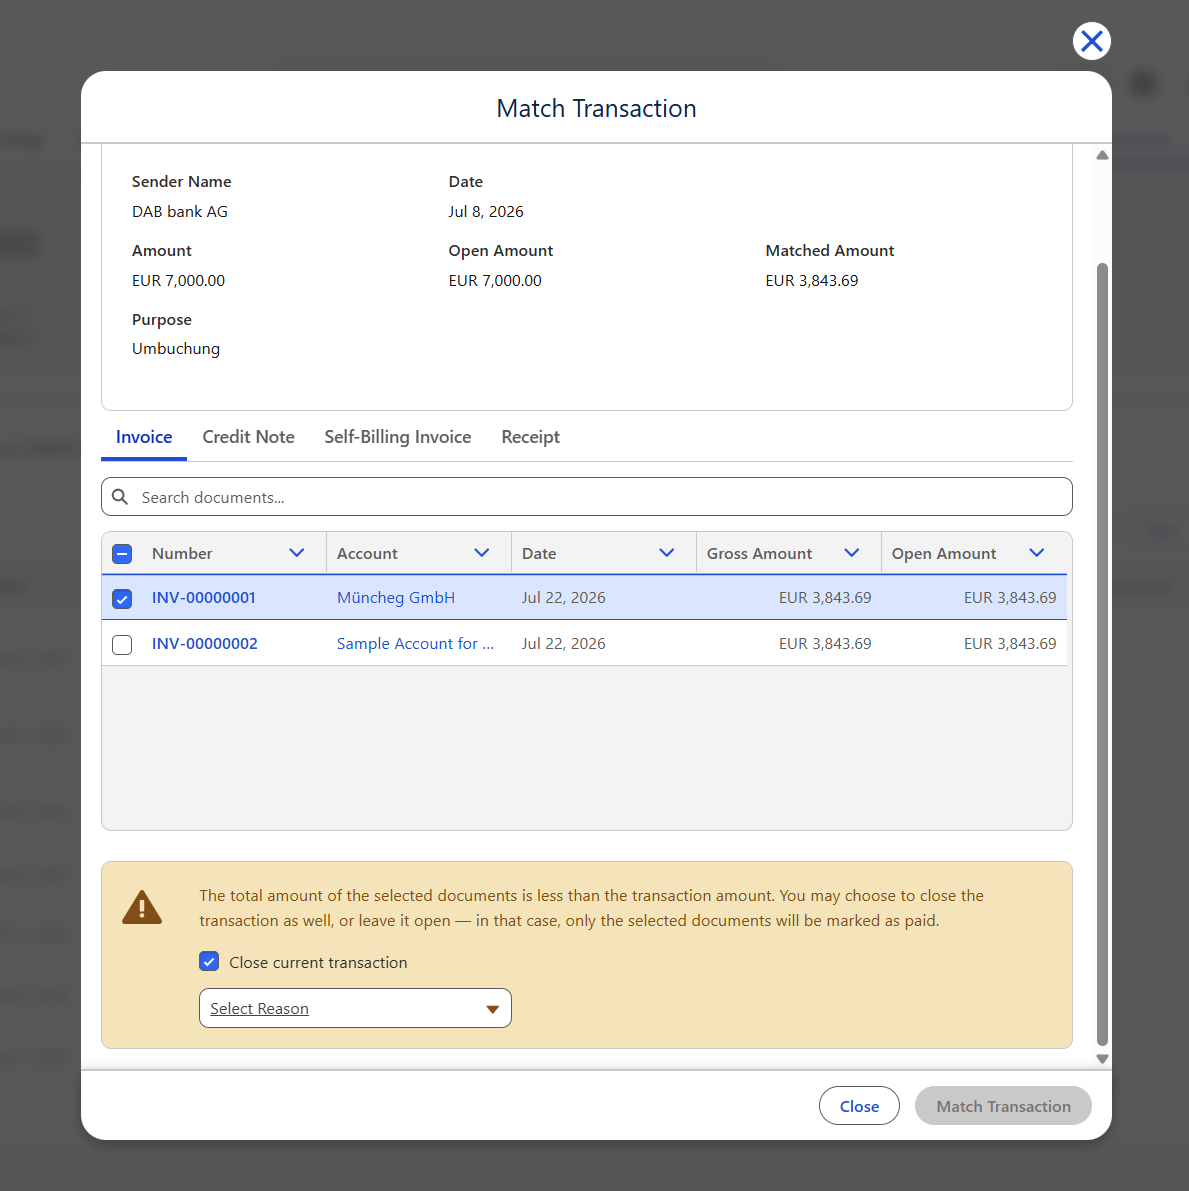
The user may either:
- Leave the transaction as partially booked.
- Close the transaction by selecting one of the following closing reasons:
- Part of a bigger payment
- Reminder fee
- Payment expenses
- Cash discount
- Partial payment
- Other
If no closing reason is selected:
- The transaction is marked as Partially Booked.
- The selected document(s) are marked as Paid.
Matching Scenario 3 – Document Amount Is Greater Than the Transaction Amount #
If the document amount exceeds the transaction amount, Finblick displays the following information:
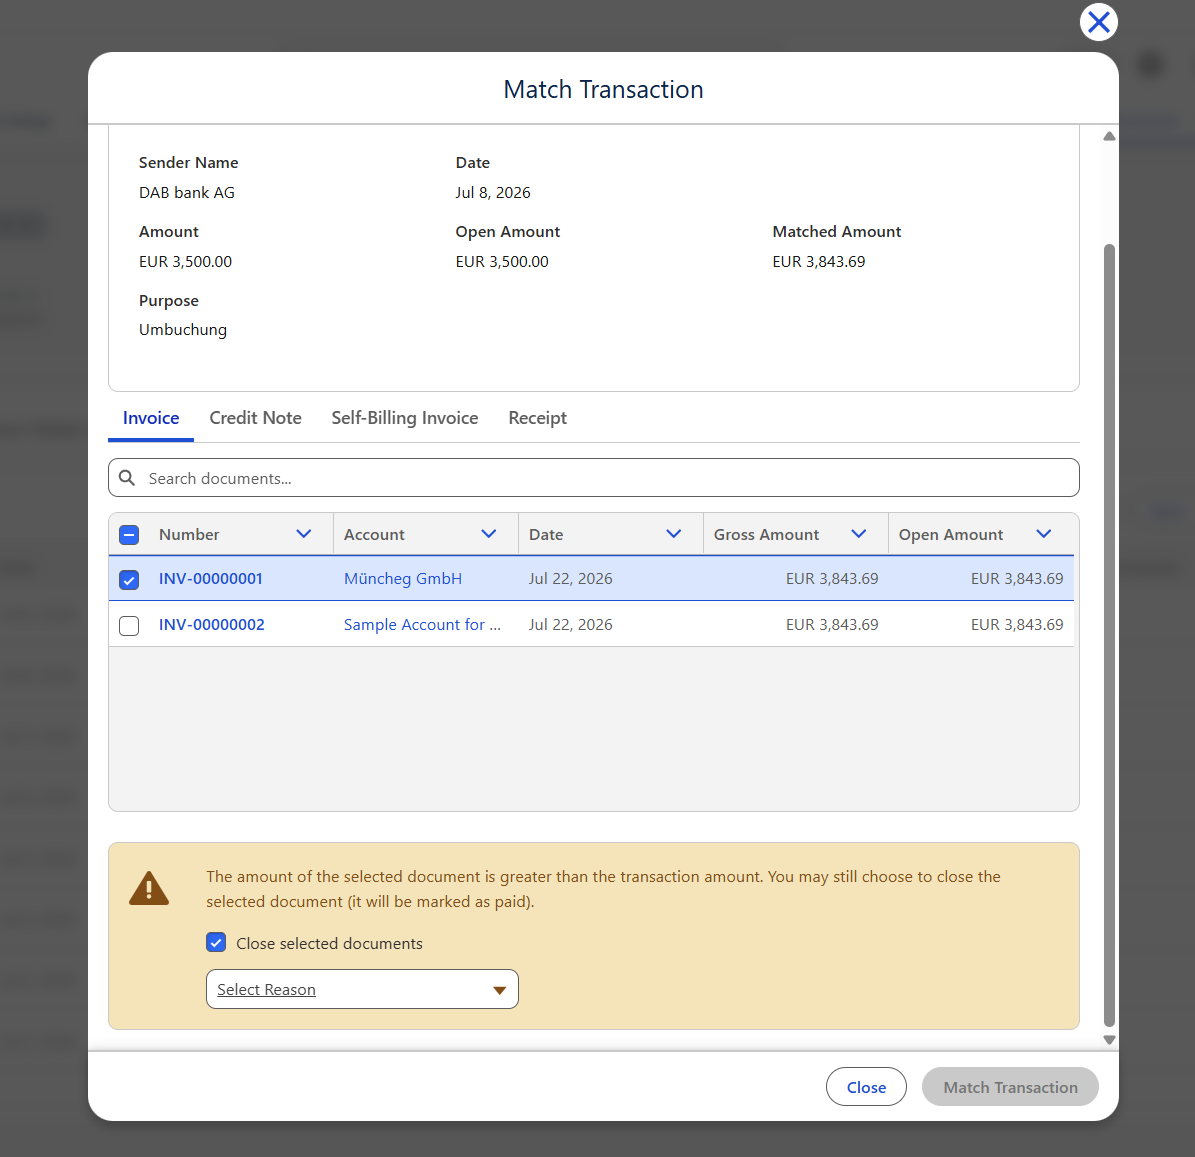
The user may either:
- Leave the document as partially paid.
- Close the document by selecting one of the following closing reasons:
- Part of a bigger payment
- Reminder fee
- Payment expenses
- Cash discount
- Partial payment
- Other
If no closing reason is selected:
- The transaction is marked as Partially Booked.
- The selected document is marked as Partially Paid.
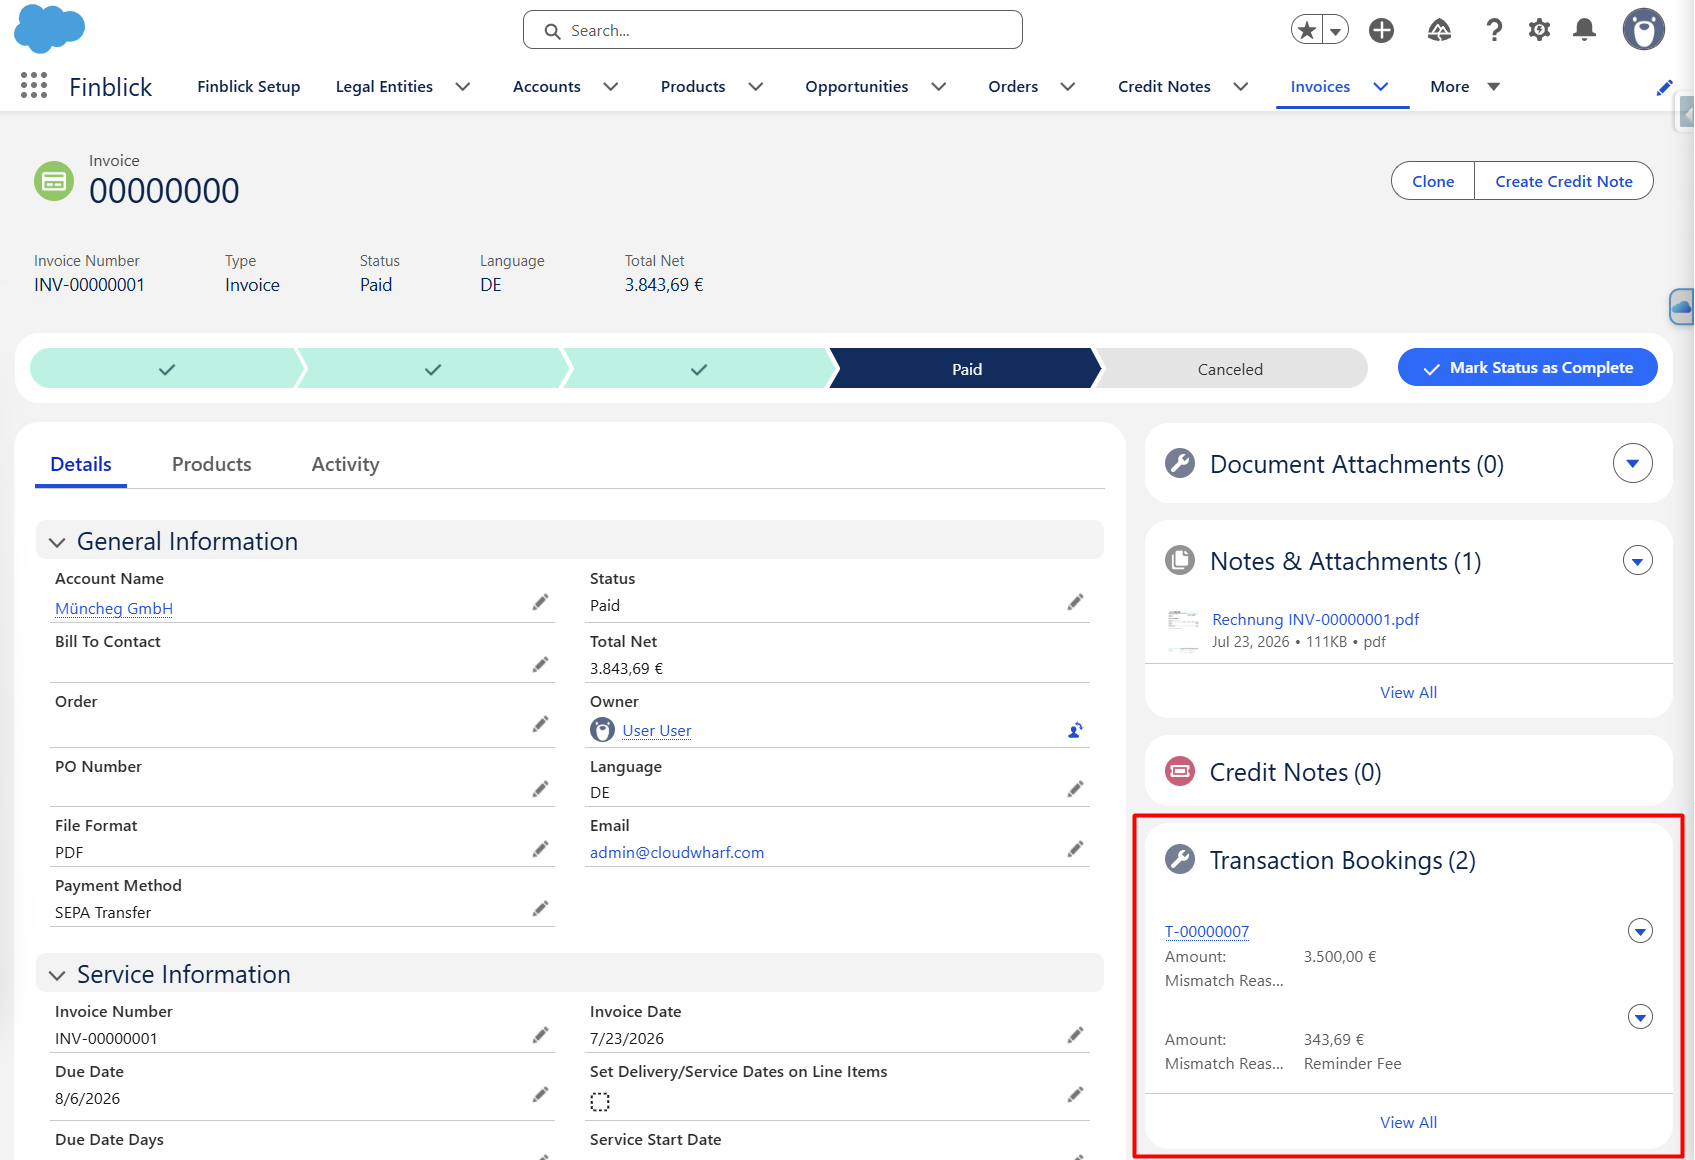
Viewing Transaction Bookings #
Every supported financial document contains a Transaction Bookings related list. The related list displays associated bank transactions and matched amount. This allows users to easily identify which bank transactions have fully or partially settled a document.
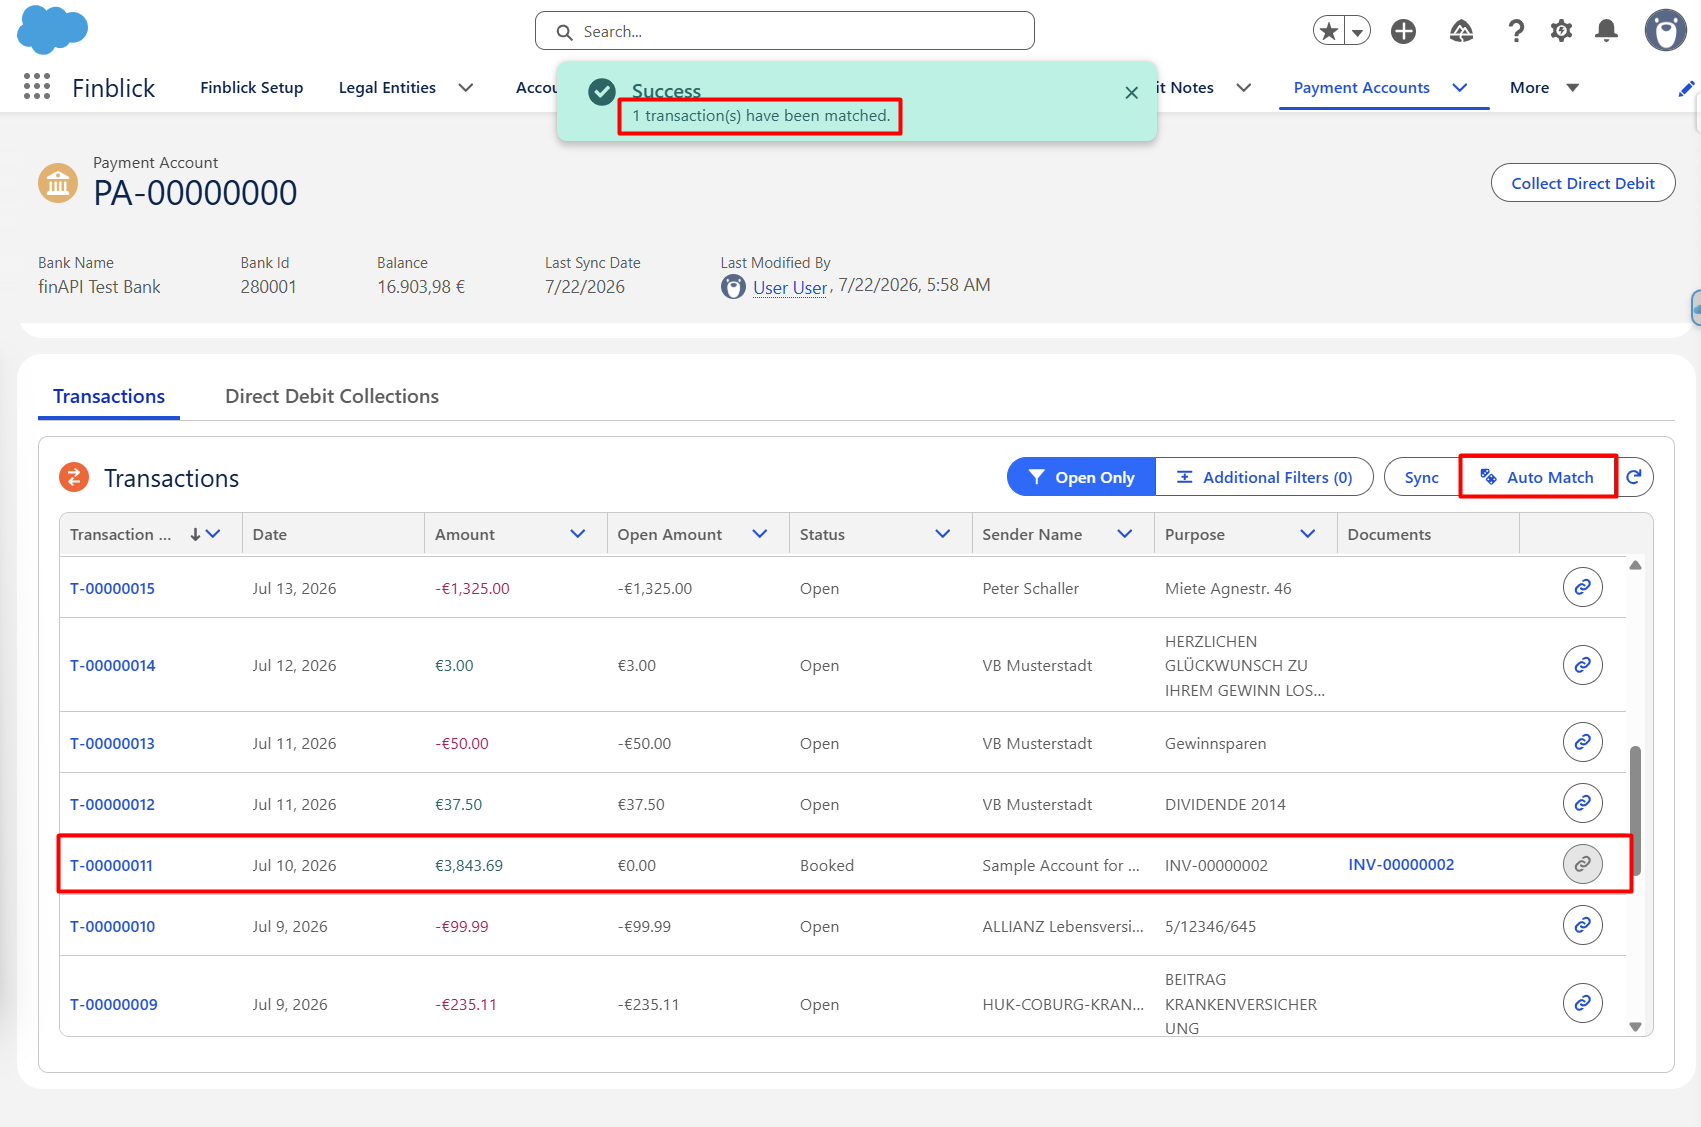
Using Auto Match #
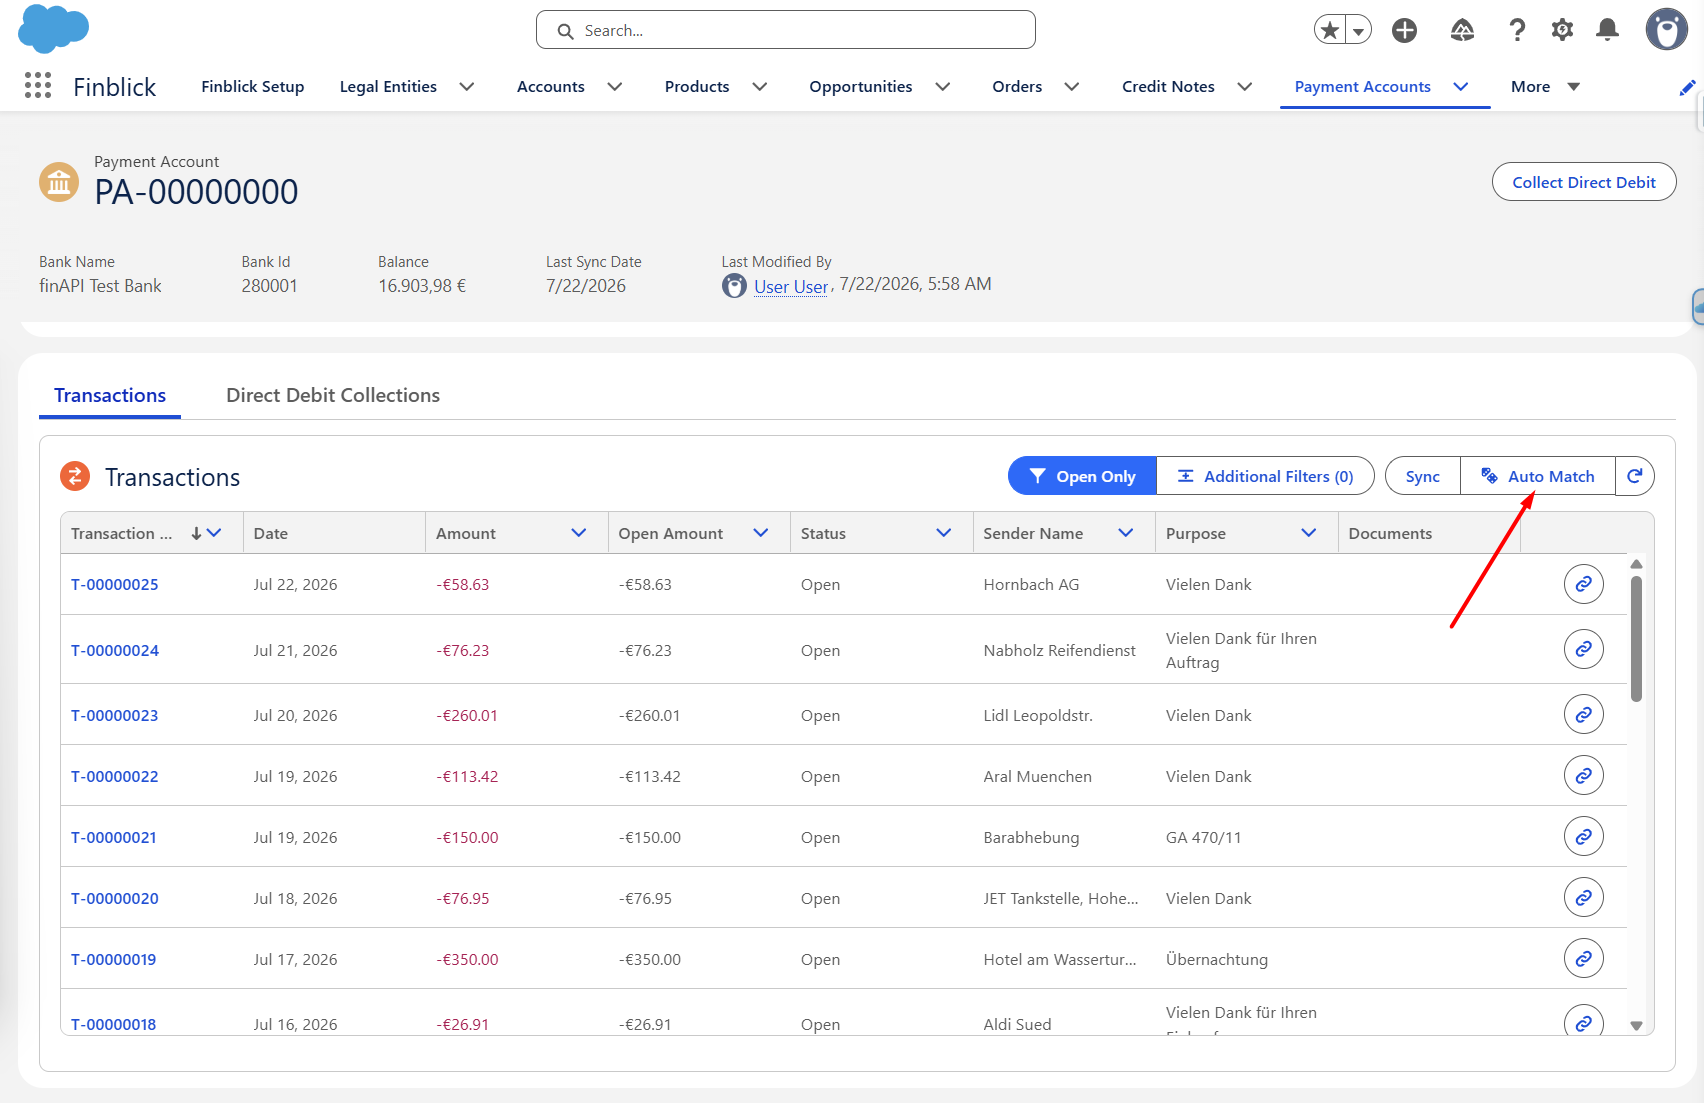
Finblick also provides an Auto Match feature that automatically attempts to reconcile transactions with financial documents.
- Open the desired Payment Account.
- Click Auto Match.
During the matching process, Finblick checks the following criteria:
- The Sender Name matches the Account Name.
- The Transaction Open Amount matches the outstanding amount of the document.
- The document number (for example Invoice Number or Credit Note Number) is contained in the transaction Purpose field.
If all conditions are met, the transaction is matched automatically.
Summary #
The Payment Accounts feature enables organizations to integrate their bank accounts with Finblick, synchronize transactions, and efficiently reconcile payments directly within Salesforce.
Using manual matching together with the Auto Match functionality significantly reduces reconciliation effort while ensuring that Invoices, Credit Notes, Self-Billing Invoices, Receipts, and Charges accurately reflect their payment status.


